Pages

Sunday, July 15, 2012

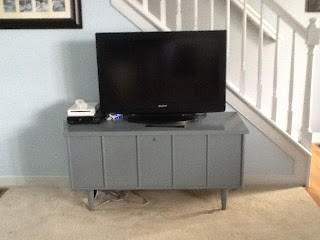
Hope Chest turned Media Cabinet Project

I finally have a project finished! Oh boy, it was a project.
I bought this old Lane Chest @ a Salvation Army in April for $20.00.  It had a leg that was broke and some scrapes and rings on it.  I loved the mid-century modern feel so I snagged it.  My original idea was to strip it and stain it but let me tell you this; I tried and staining is HARD. I ended up painting it with left over paint from my wall stencil project. (I needed more gray in my room anyways.)  It ended up pretty good though I am definitely learning a lot about "projects".  Hopefully it will translate into even better things in the future. 
Here is the before and after pics.  

I stripped the old stain and sanded lightly.  I attempted to stain it but I just did not like the results I was getting, so I ended up painting it and then placing polyurethane over the paint.  I also fixed the broken leg with just some wood glue.  Here are various pics of the project:


Any questions ask!  Let me tell you this is labor intensive so if you do not have patience do not attempt!  My car was not in my garage for 2 weeks! 

Wednesday, June 27, 2012

No More Vertical Blinds Fix!

I HATE VERTICAL BLINDS! 


So I took mine down.  I hung curtains and have been living in a non privacy world for a while.  I like to walk around my house naked sometimes and really do not want the world to see me though so here was my fix!


1.)I bought the old fashioned vinyl shades from my local Home Depot. (They custom cut for you to your dimensions; so make sure you have your measurements!)   Total Cost about $40.00.


2.) I then went to my local craft store and bought some acrylic paint in the color I wanted.  (Here I used Folk Art's 'Wrought Iron'.) This whole blind took about 7 small bottles.   Total Cost about $10.00.


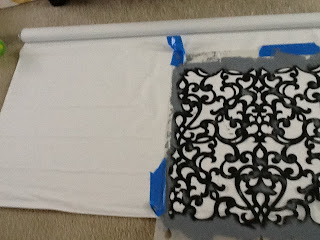
3.) I had a stencil sitting around that I had used in my living room so I used it.  Cost = free.
If you do not have a stencil you can get some at your local craft store or www.etsy.com has some good stencil stores. (The one I used is from a seller on etsy.)


4.) I sat down and stenciled the whole vinyl shade.  This does take some time especially since I did not use a roller because I wanted to sponge it.  
Let dry and hang!


Here is pictures of the process:


Before


That is it for now.  I am slowly getting my kitchen "re-done".  Can not wait till it is all done!!


Popular Posts