Pages

Sunday, September 2, 2012

I painted my kitchen countertops!

I have been eyeing people's projects of painting their kitchen counters.  I hated my counter tops and will replace them eventually so my philosophy is "It's worth a try."  Here are various pics of the process in which I did it.  I have absolutely NO experience in this; it was trial and error for some things.  Overall, they have been finished for a couple of months and I like them enough where I am in no hurry to replace them. They are not perfect though. I am still not done with my kitchen so these are not final pics (painting my cabinets white currently).

I used a lot of tips from this site: http://generalsplendour.blogspot.com/2011/02/ambush-makeover-my-formica-countertops.html


Here goes the process I took. 
 (Picture Heavy)

1.)  First I cleaned the counter tops then primed them with primer.  I recommend the Kilz shown.

2.) Next, I painted my counter tops my base color, black (high gloss). I did 2 coats of this.

3.)  Next I picked several colors of Acrylic Paint (total cost less than $20.00) that I wanted incorporated into my counter top.  Before I painted I went to my local Home store and got some sample chips of what I liked for reference.  I only used 4 colors: black, gray, silver, and white.

4.)  Next you take one of your colors and just start blotting with paper towels that are crunched up.  After that color is done, you go on to the next.  I believe I did about 7, yes 7, layers before I got what I wanted.  At first it will look not so good but as you add more and more layers it improves (see below pics.)  The pictures below are in no particular order but it gives you an idea of how each color you use will make it different.  Like I said, LOTS OF LAYERS!


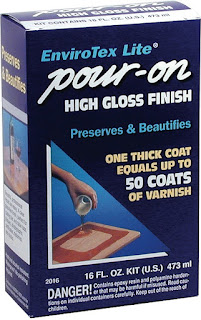
After I got the look I wanted I then I applied Envirotex.  The Envirotex was HARD to apply and costly.  If I did it again I might have tried something different due to cost.  You can find it at the craft store.  It does give a nice hard, shiny finish though!  The flat edges of the counter tops were hard to do.  

Here is a pic of the edges that didn't come out so well.


Overall, I am pleased with the outcome.  I plan on getting new counter tops within the next 5 years so I think that this was a good alternative.  I am currently painting my cabinets white which will look much better with this as well.  More pics to come...

Thanks : ) 


Wednesday, August 29, 2012

Bathroom Cabinet Makeover!

I had seen this done Pre-Pinterest when looking to do my kitchen. I had bought all the stuff but I decided to do the kitchen cabinets white (my next project).  I saw it again on Pinterest and was like, "why not?".  I believe in "KISS", Keep It Simple Stupid, so I will tell you the basics!  I am by no means a professional at this. (look at my grammar and mess. lol.)


What you need:
1) sander/sandpaper. 100/120 grit.
2.) tack cloth
3.) General Finishes Gel Stain. 1 Quart is what I had with half of it leftover. (make sure you get the GEL stain) and I highly recommend the exact brand.  I used a Java Finish. I bought mine online @ www.amazon.com.
4.) Foam brushes (2 big packs) There is drying time and you do not want to reuse old brushes.  I used my 40% coupon at Micheal's and ACMoore which makes them like $3.00 a pack which I feel is a more reasonable price for foam brushes.
5.) General Finishes Gel Topcoat Satin. 1 quart. Again I have 1/2 of it leftover.
6.) New cabinet hardware:  I bought mine at Target. (These are the $$ pricey things in this!) I think I spent like $35.00. (with leftovers).
7.) Protection for your floor/walls.  I used packing paper with masking tape, much cheaper and it works well.

Steps:
1.) Remove cabinets and hardware.  I did no remove the hinges but you can if you want.
2.) Tape off walls and floors.
3.) Sand cabinets and cabinet frame.  Again, I used my mouse sander and it is not a crazy sanding, just enough to dull the cabinets a little. I do use steel wool sometimes to get spots that are hard to reach.  I do all the sanding outside except the frame for easier clean up.
4.) After sanding,  wipe everything off with wet rag (let dry) or a tack cloth to get all the sanding dust off.
5.) Using foam brush apply coat of gel stain.  Let dry between coats (about 4-6 hours).  I did a total of 3 coats.  The first coat will look like crap, DO NOT WORRY.  It looks better with more coats.
6.) Using foam brush apply coats of  Gel Topcoat.  Again I did 3 coats.  The gel coat has a longer dry time.
7.) Put on cabinet hardware.  I had to drill some extra holes for some of my hardware. Easy, Easy!
8.) Clean up and good job!

This project is easy!  The bulk of the time is drying time.  It took me about 1 1/2 weeks, but I work a full-time job.

Here is my Before and After.


Popular Posts